The Keybow
Ben Madley, 30 Aug 2019
I’ve been a long time fan of the Raspberry Pi movement. Well, a fan from a distance. I was a teen during the initial release and the proud owner of a Raspberry Pi Model B. I never was really able to use it – a fate that seems to have befallen a great many of the Raspberry Pis – for a variety of reasons including but not limited to lack of Linux knowledge (notably that SSH was a thing), lack of space and lack of creativity. Nonetheless, I’ve been following the space and I recently spotted my opportunity with a review in The MagPi.
The Keybow
The Keybow is an interesting kit. It is a lua-controlled, RGB, mechanical keyboard. Assembly is quick and the firmware is supplied through GitHub, which you can edit by customising the layout files. The keys can run macros and Pimoroni provide macros for common Mac and Windows tasks.
What really had me excited was the lighting options. As well as the expected by key lighting settings, there is the option to define lighting with a png file, called a pattern. It’s pretty lovely.
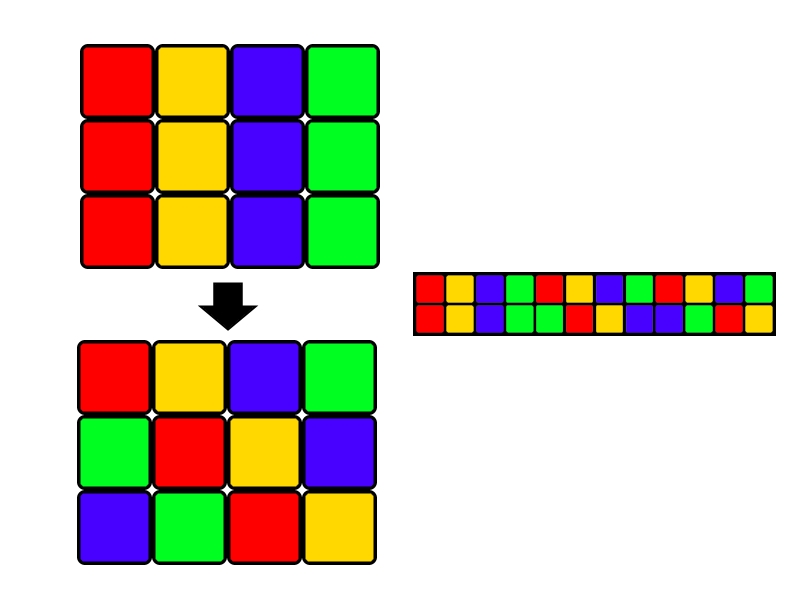
The first row of four keys are defined by the first four pixels, the second by the next four pixels, and the third row by the final four pixels of the top row. It then sets the lights based on the second row of the pattern. When it’s iterated through all the rows it loops back to the top.
The one awkward thing is that the Keybow tends to think about the keys as a 3 by 4 array numbered from 0 to 11 starting from the top left, but the patterns are 4 by 3. The first lighting configuration is defined by the first line of the pattern.
Defining a pattern
I wanted to use this functionality to recreate a Luxafor Flag. It should:
- Light up red, yellow or green to show my availability
- Rotate colours if I tap one of the keys
After a bit of poking around in the GitHub repo I came up with a plan:
- Create a pattern for red, yellow and green
- Write a new layout, where pressing any key would change the lights
Making the patterns is pretty simple. My strategy was to make a short pattern (about 10 rows long), and then stretch the image out to a few hundred pixels tall. It’s a fairly easy way to make a pattern that doesn’t change too quickly. The patterns aren’t very interesting to look at, so I’ll attach them at the bottom.
For the layout, we didn’t need to right that much code start by taking the existing blink.lua layout and stripping the contents from setup. The keybow.auto_lights(false) line tells the Keybow to use per pixel lights instead of lights by pattern.
Next we need to change the key handlers. As we don’t want the keybow to type anything, we remove the keybow.set_key lines. We then change the rest of the handler to call a rotate_lights function we’re going to write imminently. It should end up looking like this:
function handle_key_00(pressed)
    if pressed then
        rotate_lights()
    end
end
To load a new pattern we call keybow.load_pattern, so we set up a simple rotation and load our red, yellow and green patterns. We will need to create a variable in the setup function to remember which mode we are in. This gives us our final setup and rotate_lights functions.
function setup()
    light_mode = -1
end

function rotate_lights()
    light_mode = light_mode + 1
    light_mode = light_mode % 3

    if light_mode == 0 then
        keybow.load_pattern('patterns/red')
    elseif light_mode == 1 then
        keybow.load_pattern('patterns/yellow')
    else
        keybow.load_pattern('patterns/green')
    end

end
There we have it. The final change is modifying the keys.lua file to use the new layout. Then we can load it onto our SD card and plug it in. This is my final version of the code.